Solid color
A solid layer is the simplest building block: one color, with optional transparency. Use it as a backdrop, a small accent, or a neutral base below translucent gradients.
Add Solid color, select its swatch, and choose a color and alpha. Size and position still matter: a small solid layer is a colored rectangle, not automatically a full-canvas background. The shared Background controls place and repeat it.
Guides
Add Guides for non-rendering construction lines. Each layer can contain up to 32 guides; Add guide and Remove guide manage them in Properties. You can duplicate, clone, hide, or group these layers like other layers. Each guide starts collapsed, showing its number, X/Y coordinates, count, and angle with a degree symbol. Eye, duplicate, and delete buttons stay on that row. Use the eye button to hide or show an individual guide and all its spread copies without deleting its settings or bindings. Visibility is saved with the project and supports undo/redo; hidden guides have no canvas handles or snapping targets. Click the row to expand or collapse its inputs. Multiple guides can be expanded. Expanded controls use three paired rows: Count / Spacing, X / Y, then Angle / Angular spread. Every input keeps its own variable and formula binding; summaries display the current resolved values, and duplicates preserve bindings. Select the layer, then click a guide's line or its row in Properties. With No Tool, click any visible guide on the canvas to select and highlight its pattern and expand its Properties row, even when another layer is selected. Dragging or pressing arrow keys in this mode does not move or rotate guides. The first guide is selected initially without expanding it. Selecting a guide with Transform or Rotate automatically expands its row, including when you click its origin or rotation dial. With Transform, drag the line or its origin to move it; with Rotate, drag the line or rotation dial to turn it around its origin. Arrow keys nudge the selected guide, and the rotation dial supports arrow-key adjustments. Selecting any spread copy edits the whole original guide pattern, not an independent copy. Use a parent folder to transform or arrange a whole Guides layer.
With a Guides layer selected, choose the pen (Path tool) and click and drag on the canvas to add a guide. The press position sets X / Y, and the drag direction sets Angle, with a live preview. Hold Shift while dragging to snap the angle to 45-degree increments, including horizontal and vertical lines. Each gesture adds one guide and one undo step; clicking without dragging adds a horizontal guide. The new guide is selected and expanded in Properties. Parent transforms, layer offsets, pan, and zoom are respected. On other layers, the pen keeps its normal path behavior.
X / Y locates a point on the infinite line in artwork pixels. Angle is
clockwise from horizontal: 0 is horizontal and 90 is vertical.
Count generates up to 32 lines from that guide. Each additional line moves
by Spacing pixels along the original line's perpendicular and turns by
Angular spread degrees. Use zero angular spread for parallel lines, zero
spacing for a fan around one point, or combine both. Negative spacing or spread
reverses the direction. Each control supports numeric variables and formulas.
The dashed lines appear only in the editor. They are saved in projects and editable JSON, never painted in CSS, HTML, previews, or image exports. In the Path toolbar, enable Snapping → Guides to snap new or moved vertices to lines or nearby intersections. Hidden guides and construction layers do not snap.
Choose Measure to check distances or angles against a guide without moving it. Each visible spread copy is a separate measuring target, including outside the artboard. Select a guide and a shape vertex for perpendicular distance, or pair it with a straight shape edge or another guide: parallel lines show their distance and nonparallel lines show their smaller angle. See Measuring distances and angles for screenshots and selection controls.
Gradients
Add Gradient, then use Type in Properties to choose linear, radial, or conic. All three use the same color-stop editor. The difference is how those colors travel through the layer.
Linear gradients
A linear gradient blends along a straight direction. Angle is in degrees:
0 points up, 90 right, 180 down, and 270 left.
Choose 90 for a left-to-right blend or 135 for a diagonal.
Try a dark blue stop at the start and a warm pink stop at the end. Change the angle before adding more colors; direction alone can change the whole mood.
Radial gradients
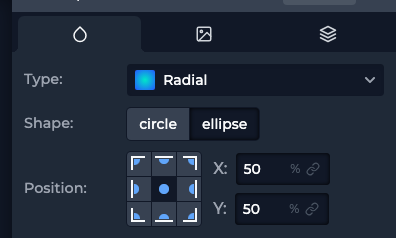
A radial gradient spreads outward from a center. Choose Circle for a round
falloff or Ellipse for one that adapts to the layer's proportions.
Position X / Y sets the center in percentages; 50 / 50 puts it in the middle.
For a glow, start with an opaque light color and end with that color at zero alpha. Move the center off to one side for a less symmetrical light source. Resize the layer to change the footprint of the effect.
Conic gradients
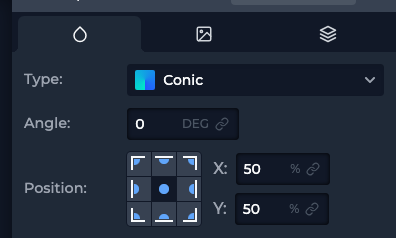
A conic gradient sweeps around a center, rather than away from it. Angle rotates the start of the sweep, and Position X / Y moves its center within the layer.
Use it for color wheels, wedges, or a rotating-light feel. Match the first and last stop colors for a continuous seam, or deliberately make them different for a visible edge.
Color stops, easing, and repeat
Click the gradient strip to add a color stop. Drag its marker or enter its percentage in the row below. Click its swatch to change color and alpha; the row's duplicate and trash controls copy or remove it. At least two color stops remain in a gradient. There can be up to 20 stops, including transition modifiers.
Stops close together make a quick transition; stops at the same position make a hard edge. A colorless hint adjusts the midpoint between neighboring colors. Hints and easing affect the transition only while they sit directly between two color stops.
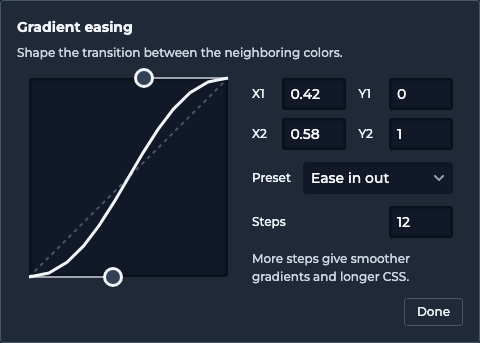
Choose Add easing between neighboring colors to shape the blend. Open its
curve control and choose Linear, Ease, Ease in, Ease out, Ease in out, or Steps.
You can also drag the two curve handles or edit X1, Y1, X2, and Y2 for a custom
cubic curve. These coordinates run from 0 to 1.
Steps accepts a whole number from 2 to 128. For a smooth curve, more
steps produce a finer approximation and more generated CSS. With the Steps
preset, each step holds its color before jumping to the next.
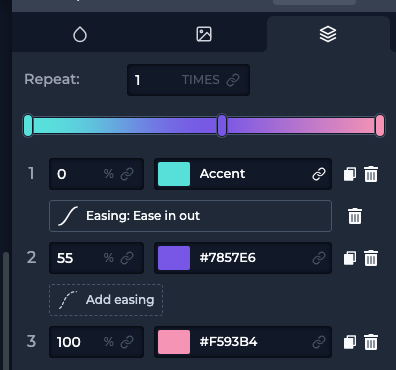
Colors > Repeat repeats the color sequence; 1 is a single cycle.
This is separate from Background Repeat, which repeats the whole layer.
Try a hard-edged two-color gradient with a higher color repeat for stripes,
then adjust Angle to turn them diagonally.
Noise
Noise gives a clean composition a little surface detail. Choose Fractal noise for softer variation or Turbulence for a more ridged result.
- Color mode keeps the generated color channels; Monochrome removes their color; Tint uses the chosen tint color and its alpha.
- Frequency (
0to1) controls detail density. Higher values create finer grain; lower values create broader variation. - Octaves (
1to8) adds levels of detail. More isn't always better, especially for a subtle overlay. - Seed chooses a repeatable noise field. Keep it fixed while tuning other settings, then change it when you want a different arrangement.
- Contrast (
0to4) controls the strength of tonal variation, with1as the default. - Opacity (
0to1) fades this noise layer, not the layers beneath it.
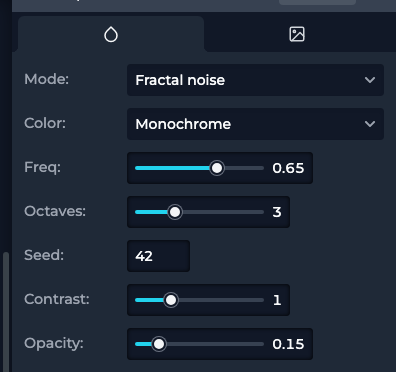
For a starting point, place monochrome noise above a gradient with Frequency
0.65, Octaves 3, Seed 42, and Opacity 0.15. Increase the opacity only
until you can feel the texture.
Patterns
Patterns repeat marks inside the layer. Choose Dots, Stripes, Grid, or Checkerboard, then tune the rhythm:
- Spacing changes the distance between marks or the checker size.
- Dot size changes dot diameter; Thickness changes line width for stripes and grids. Checkerboard doesn't use either control.
- Rotation turns the internal pattern.
- Foreground colors the marks; Background colors the space behind them. A transparent background lets lower layers show through.
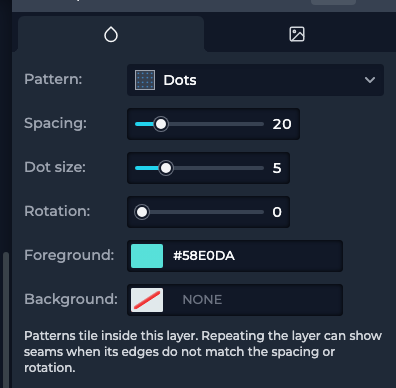
The pattern uses a normalized 200-by-200 drawing area, scaled to your layer. Its spacing values are not a promise of one screen pixel per unit. Resize the layer to scale its appearance, or change Spacing to fit more marks within it.
Internal repetition fills the layer; Background Repeat tiles the complete layer. A rotated pattern or mismatched tile boundary can reveal seams in that second kind of repetition. Check a few neighboring tiles before calling it finished.
Shapes
Start with Rectangle, Ellipse, Polygon, Star, or Custom shape.
Set Fill, Stroke, Stroke width, and Rotation for the overall look.
Moving vertices or curve handles preserves the border's thickness, even when the
path grows beyond its original bounds. Resizing the whole layer still scales its
border along with the shape.
A stroke width of 0 hides the outline.
Stroke width uses a number input. The link buttons beside Fill and Stroke accept
Color variables; Stroke width and Rotation accept Number or Function variables
and formulas. Choose Static value to edit a linked property directly again.
Rectangles have Corners for rounding. Polygons have Sides (3 to 32).
Stars have Points (3 to 32) and Inner radius: a smaller inner radius
makes deeper notches. Ellipses need no extra preset geometry.
These shapes use a normalized 200-by-200 space, then stretch into the layer's Background Size. Unequal width and height turn a circle into an oval. Rotation turns the sized shape without squeezing it; the Transform frame and Path tool follow the same rotation.
The Transform frame follows the shape's curve extrema and visible stroke, not the empty space in its 200-by-200 coordinate area. Moving and resizing the frame preserves that coordinate system; selecting a shape does not move or stretch it. Curves and rotated shapes can extend beyond the coordinate area without being clipped. Background Repeat still uses the saved Background Size as its spacing. On repeating axes, copies keep their existing tile clipping rather than overlap.
Safari currently has a rendering limitation for HTML exports that combine shape rotation with live, variable-bound Background Size. The editor and exports with fixed sizes do not use that rendering path.
Draw and edit paths
Select a shape and choose Path tool to edit its geometry. With a different kind of layer selected, the tool creates a new shape instead.
When drawing, click to place a straight vertex or click and drag to create curve handles. A drag must move at least 5 screen pixels before it creates curve handles, so small pointer movements still create corners. Hold Shift when placing a vertex to align it horizontally or vertically with the previous vertex, whichever is closer. This alignment takes priority over snapping. Click the first vertex after adding at least three vertices to close the path. New subpath starts another path in the same shape.
Switch to Select vertices, then drag empty space to draw a selection box. Click a vertex to select only that vertex. Double-click a vertex to select all vertices of its shape, including disconnected parts previously combined with Merge, without selecting other shapes in the same layer. Overlapping hit areas pick the closest vertex or curve handle instead of whichever was drawn last. Command-click on Mac or Ctrl-click on Windows/Linux toggles a vertex in the current selection without clearing the others. Dragging an already selected vertex still moves the whole selection. Hold Shift to add vertices. Drag selected vertices together; hold Shift while dragging to constrain movement horizontally or vertically in canvas space. The axis follows the larger movement from the drag's starting position; release Shift to move freely again. Select one vertex to adjust its incoming and outgoing handles. Hold Shift while dragging a handle to mirror the other handle. Curve handles also snap to guides and their intersections when Snapping → Guides is enabled, including while drawing curves. Once a vertex or handle snaps to an intersection, it stays there until the pointer moves more than 6 screen pixels away from at least one of the intersecting guides.
Use Cmd+C / Cmd+X on Mac or Ctrl+C / Ctrl+X on Windows to copy or cut selected vertices. Select another shape layer with the Path tool active, then use Cmd+V / Ctrl+V to paste them as separate subpaths at their original canvas positions. Curve handles and connections between adjacent selected vertices are preserved; disconnected selections stay separate. Cut and paste support Undo and Redo.
Click an edge or use Add vertex to insert a point. Dragging from an edge instead starts box selection without adding a vertex. Use Remove vertex or Delete to remove the selection. Make curve adds handles; Make corner removes them from all selected vertices in one action. Open path breaks the edge immediately before the selected vertex, making that vertex the first endpoint. Select two open endpoints and choose Connect vertices to add a straight edge between them. Selecting the two ends of one contour closes it; selecting endpoints of two contours joins them into one open contour, preserving existing curves. Interior vertices cannot be connected this way. Continue path resumes drawing from an open contour.
To round a corner, select its vertex, set Corner distance, and choose Round vertex. For several selected corners, use Round vertices. Each corner becomes two editable vertices joined by a smooth curve; existing curved edges keep their shape outside the rounded section. The distance is in the layer's local pixels along each adjoining edge and can reach the next vertex. Only edges shared by two selected corners are capped at half their length, so adjacent rounded corners cannot overlap. Open endpoints, straight vertices, and zero-length edges cannot be rounded. Change the distance before rounding; Undo restores the original corner so you can try a different amount.
Select two or more vertices from the same path and choose Merge vertices to replace them with a sharp corner at their average position. The merged vertex occupies the first selected vertex's place in path order; other selected vertices are removed, and unselected vertices keep their order and handles. Selections may be non-adjacent, but cannot span multiple subpaths. A closed path becomes open if fewer than three vertices remain. Undo restores the selection and original vertices. On an open contour, merging its two endpoints welds them into one vertex and closes the contour rather than adding an edge between them.
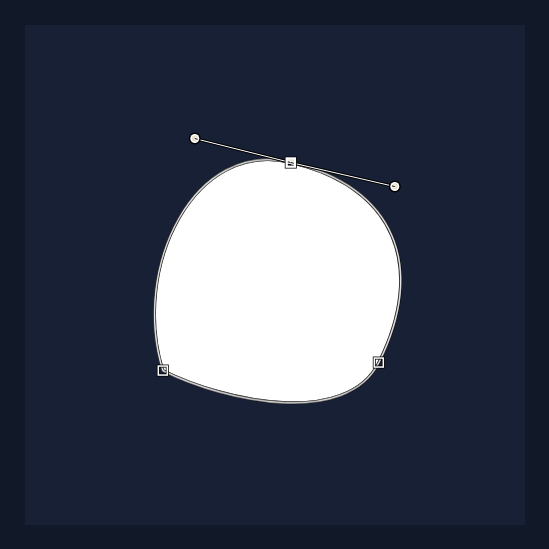
Arrow keys nudge selected vertices or a focused handle; Shift increases the nudge. Clicking a tool or a Path toolbar action returns keyboard focus to the canvas, so arrow keys keep editing the selection. Keyboard-focused toolbar buttons still support arrow-key navigation. Every completed path action is saved immediately to the document, including each drag when you release the pointer. Undo and Redo use one global history for path edits, layer changes, and properties, in the order you made them. Press Enter, choose Done, or switch tools to leave path editing without losing changes. Escape cancels an active drag; otherwise it first leaves drawing mode, then exits the tool. Use Undo to reverse completed edits.
You can change Fill, Stroke, or Stroke width in Properties while editing a path. Appearance changes keep the current vertices and selection. Hiding layers or folders, reordering layers, and switching selections never discard completed path edits.
Combine and arrange paths
Select vertices from at least two closed paths to enable joining:
- Unite combines their filled areas.
- Subtract cuts the other selected paths out of the first selected path.
- Intersect keeps only their shared area.
- Exclude removes the overlapping areas.
Selection order matters for Subtract; the control's tooltip identifies the first selected path. Clicking the active joining operation again turns it off. Merge turns the selected result into editable geometry; Undo restores the originals. Reselecting a joined group in a different order does not change the operation or subtraction order used by Merge. Without an active join, Merge uses Unite. Disconnected regions and holes remain separate contours of one logical shape: double-clicking any of its vertices selects all its parts. This grouping survives saving, reopening, and Undo/Redo.
With several vertices selected, the top bar also offers alignment and distribution. These arrange vertices within a shape, not separate layers.
Custom SVG paths
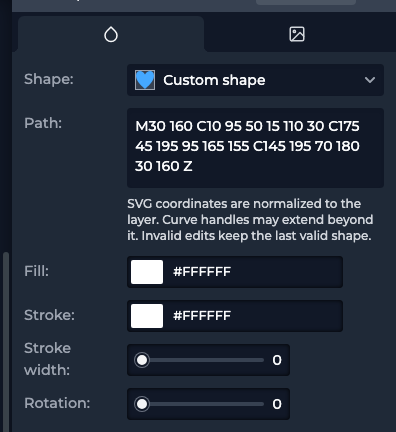
Choose Custom shape to edit Path directly. Enter SVG path geometry, not an
entire <svg> document. For example, this makes a triangle:
M100 15 L185 185 L15 185 Z
Endpoints must stay within 0 to 200 on both axes. Curve handles may extend
beyond that area. Paths are limited to 128 commands and 4,096 characters.
Invalid edits show a message and keep the last valid shape on the canvas, so
fix the highlighted input rather than assuming the preview accepted it.
Textures
Textures package procedural detail into four starting points: Paper grain, Clouds, Marble, and Wood. Choose a preset, then make it yours.
Scale changes the size of the features. Distortion bends the result and is available for clouds, marble, and wood, but not paper. Contrast changes tonal separation. Seed picks a repeatable arrangement. Foreground and background colors map the texture to your palette, including transparency. Switching presets also resets those two colors to the preset palette.
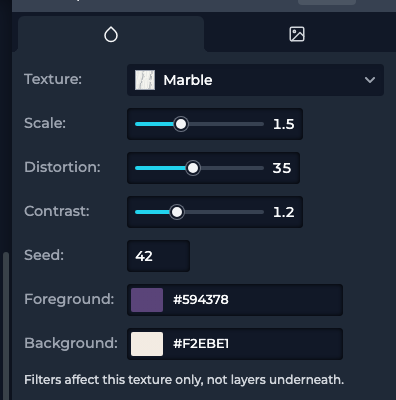
Try Marble with Scale 1.5, Distortion 35, Contrast 1.2, and Seed 42.
These settings affect only this texture. Use
folder filters when several layers need the
same treatment.
Text
Add Text, or choose Text tool with no text layer selected to create one. Select an existing text layer first if you want to edit it rather than add another.
Type in the canvas editor or in Text under Properties. Enter adds a line. Done, Escape, or Command/Ctrl+Enter finishes canvas editing; Escape does not cancel changes already applied. Use Undo if you want to restore earlier text. Text supports up to 500 characters and eight lines.
With a text layer selected, Transform offers Bounds and Scale. Bounds is the default: resize the rectangle without stretching the letters, spacing, or stroke. Scale stretches the text with the rectangle, as before. Bounds preserves existing line breaks; automatic word wrapping is not included. Text remains vertically centered, with each line following its alignment. Both modes support Undo and Redo, and the box dimensions survive saving and export.

Typography and appearance
Montserrat is the built-in starting font. The searchable Font picker offers Google fonts; available weights and normal or italic styles depend on the selected family.
Font size sets the size inside the normalized layer, while Background Size scales the whole text layer. Spacing changes letter spacing. Alignment positions each line left, center, or right. Fill, stroke, stroke width, and rotation control the final appearance.
Font size, spacing, and stroke width use number inputs. Their link buttons let you select a compatible number variable or enter a formula. Fill and stroke have the same link control for color variables. Choose Static value to unlink a control.
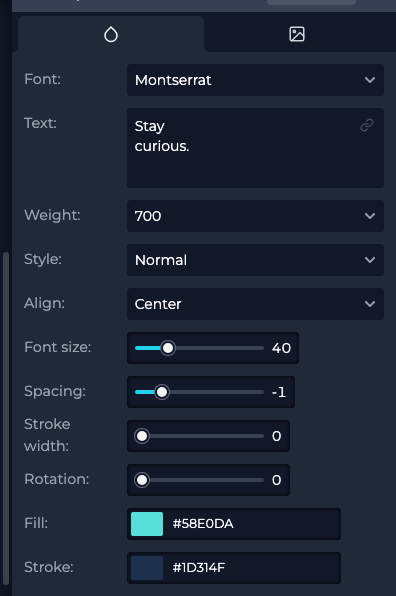
Font selection may need a moment to load and validate. The preview keeps the last valid text while that happens; use Retry if the editor reports a loading error. Don't assume a fallback font is the final result.
Text artwork uses inline SVG and font resources, not just a CSS background. When using generated artwork outside the editor, keep its font requirements with its markup so the type doesn't silently change.
Combine layer types
For a soft-lit backdrop, combine a dark solid base, an off-center radial glow, and low-opacity monochrome noise. For a graphic badge, clip a gradient to a shape and place text above it. For a textured wordmark, clip a texture layer to a text base.
Start with a small stack and change one thing at a time. Most of the character comes from the relationship between layers, not from the number of controls you use. Revisit layer ordering and clipping masks when the pieces look right separately but not together.